Sunday 30 October 2016

Heirloom quilt


Here is the 2017 class quilt. You can choose your own colours (I chose red and green - with a slight detour into turquoise and pink) but at least you can refer back to this if you wish. 

Sunday 20 July 2014

Mariner's Compass

The September meeting will be to make a Mariner's Compass block.  This 16 point one isn't very hard, especially if you're familiar with paper piecing.  This method helps very much with ensuring accuracy. 
 
 
If you're an unfamiliar or unconfident paper piecer, then you could start with this smaller, less complicated compass.  It'll still help you get home!


For the first compass you will need at least 2 different fabrics for the spokes and a maximum of 16.  One fabric for the centre circle and one for the centre ring.  A fat quarter of each will be plenty. 
Half a yard of star ray background fabric and then a similar amount for the square background.
For the second compass you will need between 1 and 8 different fabrics for the rays, a fat eighth for the ray background, a 5" square for the centre circle and a 12" square of background fabric.

For both you will need a post card, paper scissors, freezer paper, kitchen foil, cereal box cardboard, pair of compasses, spray starch.  (If you don’t have the last 5 items, don’t go out and buy them, I have plenty.)


Saturday 5 April 2014

Feathered star

After March's successful class de-mystifying foundation piecing, we will tackle the wonderful feathered star in May!

 
This block isn't technically difficult (the only new thing is a partial seam) but relies heavily on accuracy.  The half square triangles are very small, and the whole thing won't fit together unless you cut carefully and have a consistent quarter inch seam. 
I suggest you use three colours, a dark, medium and a light.  Although the block finishes at 15" you only need a half yard of background fabric (light), a fat quarter of medium and a fat eighth of dark. 


Wednesday 1 January 2014

January class

Let's hope the weather is kind to us this year, and the hall is accessible in January.  We will be continuing our foray into free piecing, and this time making dogs (or another animal/shape of your choice).  I made my dogs multi-coloured, but you could stick to realistic colours (grey, brown, black) for yours, against a neutral or light coloured background.


You will need quite a lot of background (as free piecing can be quite wasteful) and about a fat eighth or equivalent of each dog fabric.  This will be a fun day, and I'm already looking forward to it!
 
** Please note the change of date for the March class.  Sorry if it's put you out. **

Sunday 15 September 2013

Autumn leaves

The September meeting started very appropriately with show and tell.  Well, Emily didn't actually bring her jelly roll quilt with her, but she sent me this photo, so I thought I'd share it.  I know she has put the borders on now, so maybe it will be finished for the next class.  The warm beige background really compliments the colours of the jelly roll.
 
 
Debbie brought this lovely quilt to show.  She had made it from small squares, and said it was very time-consuming to make - all those seam matches!  never mind, it was worth it, and her colour choices are fabulous.


Hazel had made another scrappy bargello, or trip round the world.  I love the colour gradation.

 
Now onto the business of the day.  Paula and Rosemary had chosen batiks which moved from green to brown, and were perfect for this exercise.  Margaret and June had greens, again perfect.

 
Pauline's eye had been taken by some Fabric Freedom fabrics in bright greens, oranges and turquoises.  (She was lucky to take them away with her at the end of the session as Paula and I had taken a definite shine to them!) 

 
Rachel didn't disappoint with her fabric choices, as she had black and white spots, and then more black and white fabric with camper vans on it.  These fabrics made a real statement!

 
Kate, Emily and Paula were generous enough to make blocks for Linus.  This way they were able to try the technique, without the stress of starting another quilt.  I forgot to take a photo of their blocks, but they made 8 completed blocks between them, and Paula kindly took all the blocks away with her, to join together.

 
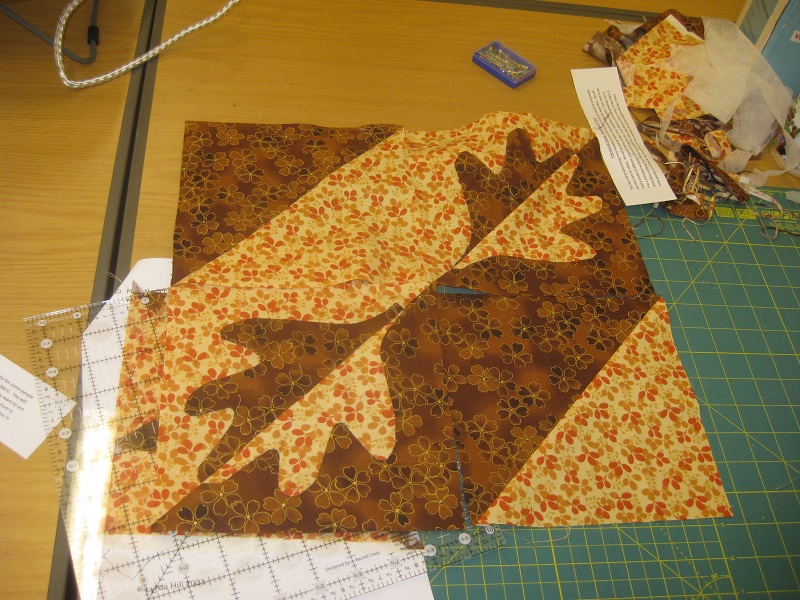
Here is Kate cutting one of her blocks.  Gorgeous colour choices.

 
Paula and Rosemary enjoyed getting the technique under their belt, but felt that two blocks were sufficient.  Rosemary made a couple of half square triangles to complete a panel for a cushion.  How clever is that?

 
She liked them with the colours together, but we tried the blocks the other way round for fun.

 
Rachel was  planning to put these blocks in with her granny squares, but thought maybe the fabrics were a little loud.  She felt it needed a calm space on it, to show the busy blocks to their advantage.  One idea was to made a large appliqued heart in the middle on a white background as a foil for the other blocks.  She put her leaf blocks in each corner.  Wonderful 

 
She obviously is a chip off the old block, as Betty used the technique as inspiration for a Christmas table runner, with holly leaves.   This will be an entry in the Piecemakers Christmas competition.
 
 
And here is an example of the houses we will be making in November.  They are free-pieced and great fun.  I used them to add a bit of fun to this quilt I made for my great-niece.  She loves it,
 
 
You could just make a few, like I did, or make a whole town!

Monday 26 August 2013

Turning leaves quilt

September's quilt will be 'Turning Leaves'.  It's a nifty technique which can be used for all kinds of images, and is very easy to do. 
 
 
Here is mine which I made in autumnal shades of green, brown, gold and burgundy.  You could do the same, or have more spring-like shades of greens or go onto a non-natural palette of primary colours or neons!  The important thing is to make sure you have darks and lights, or at least fabrics with a definite contrast (can you see the leaf with the mid-green background just under top left?  That adds a bit of interest.  You'll need several different colours plus some way of appliqueing the leaves onto the background.  You can use Heat and Bond, or I'll show you how to make a faux needleturned result using lightweight Vilene.  Bring whichever you would prefer, but I'll bring some Vilene so everyone can have a go at this method on the day, even if you plan to stick your leaves. 
See you on the 14th September!

Sunday 30 June 2013

Granny squares

This post has been such a long time in coming, but I'm afraid I've had oother things on my mind, so no apologies.  First of all, show and tell.  This is Emily's first completed quilt!  It's a lovely cot quilt which I am sure will be appreciated by its new owner.  Well done there, Emily!

 
And here are some Magic Tiles from last time's class.  All looking so good!


 Then is was heads down and sew!  Julie and Rachel were hot off the mark.

 
Sue and Hazel were still cutting while Sian was already machining!

 
Lots of activity from Paula, Rosemary, June and Betty.

 
And it's a finish from Sian!  She had some lovely novelty fabric which she didn't want to cut up, so made this giant block!  Fabulous!

 
Here is an arrangement, waiting to be joined together.

 
One down, next one ready for joining.

 
I'm endlessly fascinated how value can channge the look of a block.  The one above is a clear 'X' shpae, while others look like squares, or stripes.

 
Pretty pastels.

 
Brights.

 
Three blocks, all with a different look.

 
Lime green always looks so good!

 
Pretty in pink (and green).

 
Another set giving very different effects.

 
Playing, playing, it's the best way to learn.

 
The brown adds such definition to this colour scheme.

 
The blue background is the perfect foil for these colours.

 
And now for the next meeting.  It will be on 6th July and you will need a jelly roll (or yardage to cut 36 two and a half inch strips from).  Try to get one which has lots of similar values, rther than one which has everything from light to dark.  You also need two and a half metres of background fabric.  The whole quilt top (including the border triangles) will be made from that.
 
 
See you on Saturday!